보통 큰 시스템 운영하면 EMS 등을 통해서 서버 이상 시, 담당자에게 문자가 보내집니다. AWS에 서버 이상시 메신저로 보낼 수 있도록 모니터링 기능을 설정하겠습니다.
사용한 메신저는 Slack입니다.
- 슬랙 회원가입
해당 링크를 통해 Slack 회원가입을 진행합니다.
자 그럼 위와 같이 워크스페이스 생성하라고 나오는데, 워크스페이스 생성해줍니다.
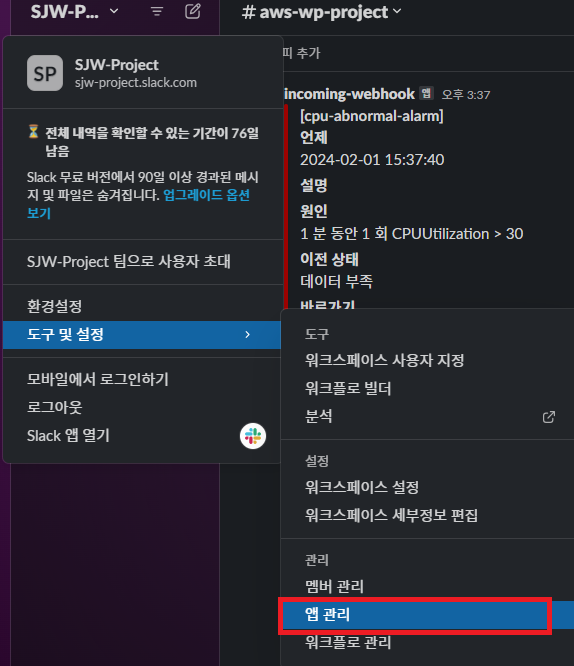
- 그리고 본인 워크스페이스 해당하는 곳에 클릭하고, 도구 및 설정 -> 앱관리로 들어갑니다.
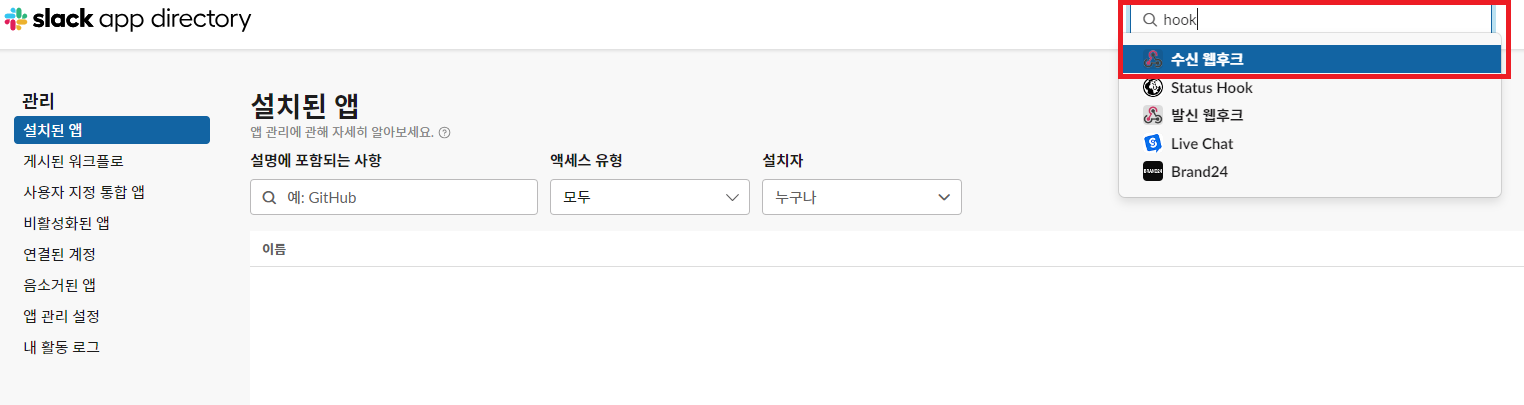
- 검색창에 web-hook 를 검색합니다.
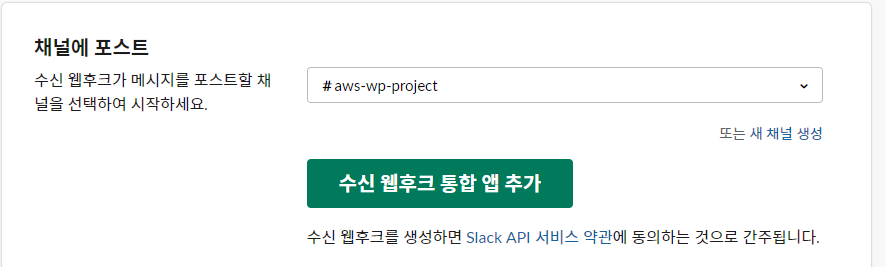
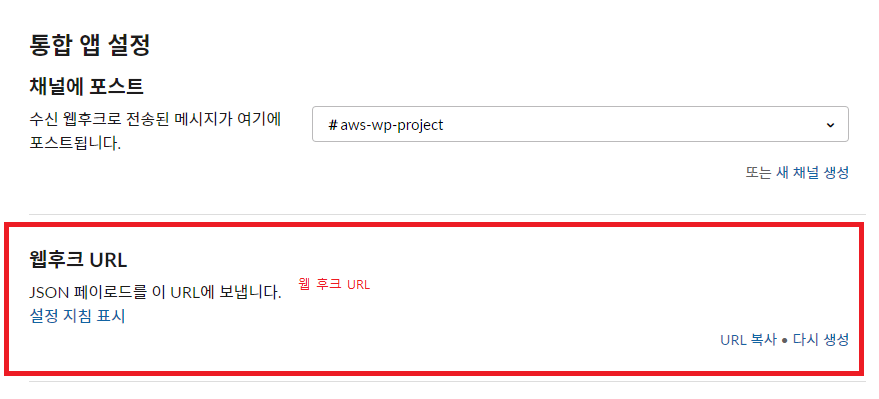
- 그리고 수신 웹후크를 추가해줍니다!
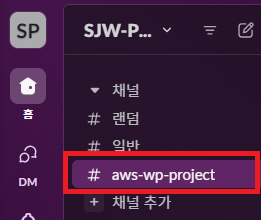
- 채널은 본인이 아까 만든 채널에 연결합니다.
- 자 그럼 웹후크 각종 설정이 나올겁니다.
- 여기서 웹후크 URL은 따로 보관합니다. (나중에 쓸 일이 있습니다)
2. AWS SNS 설정
- SNS : 구독형 알림 서비스 , 구독된 이벤트 발생시, 메세지를 전달하는 서비스
- AWS Cloudwatch에서 서버 자원을 모니터링합니다.
- 이상이 발생하면 SNS에서 경보가 전송되고 SNS는 람다를 호출합니다.
- 람다에 정의된 Slack에 메세지를 보내는 함수가 실행됩니다.
- SNS서비스 -> 주제 -> 주제 생성
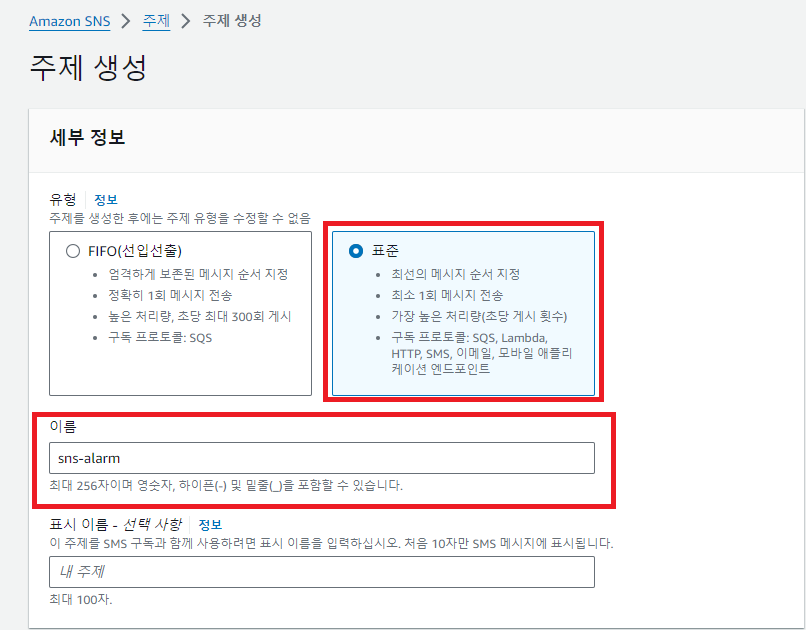
- 위와 같이 유형을 표준으로 두고, 원하는 이름으로 설정합니다.
3. CloudWatch
- 이젠 CloudWatch에서 경보를 생성하겠습니다
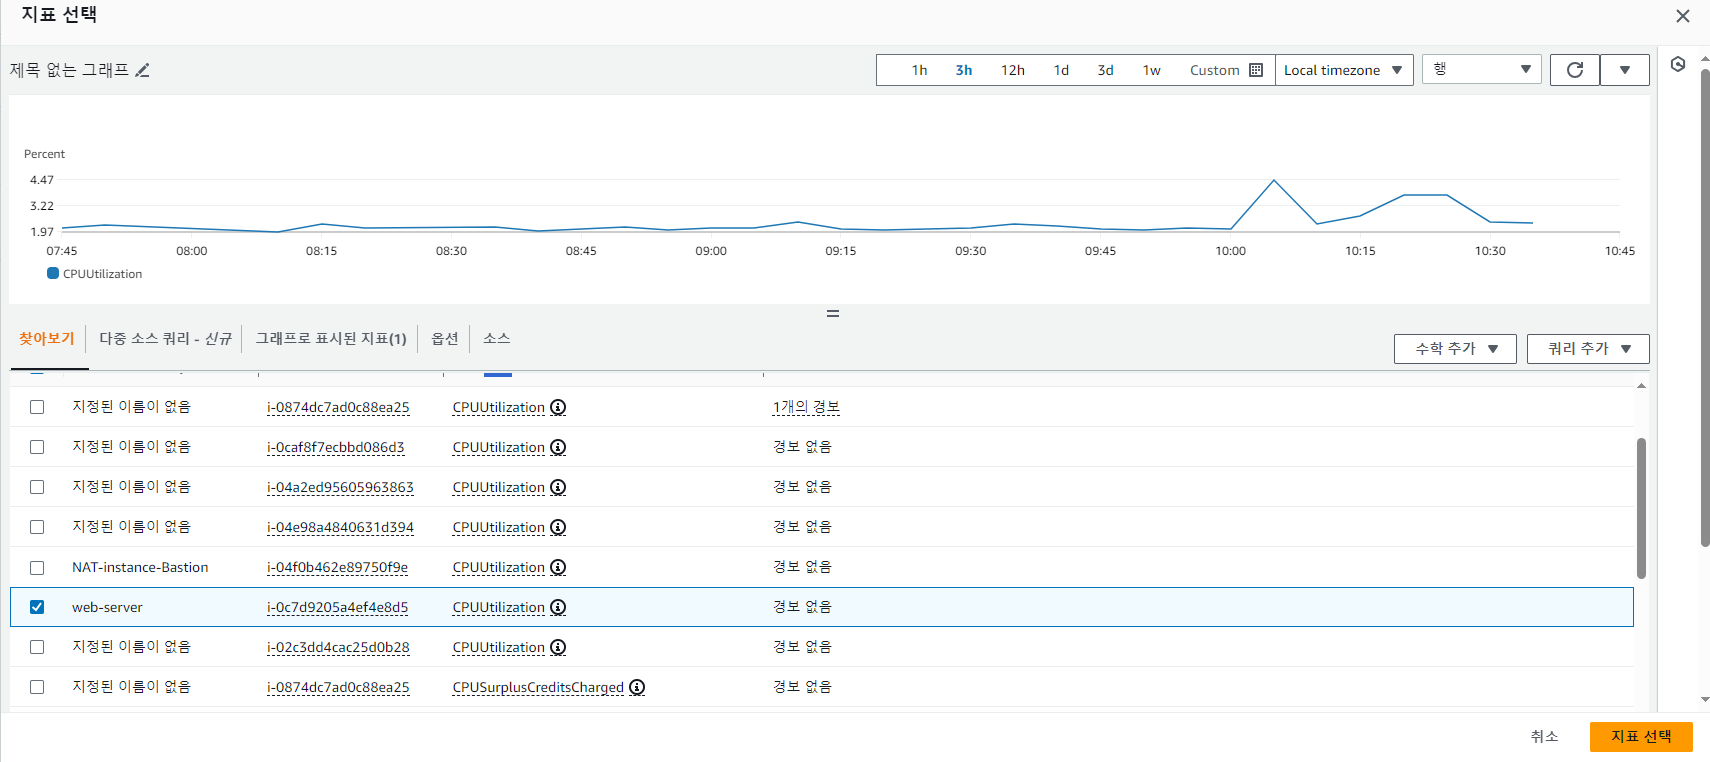
- CloudWatch -> 경보생성
- 지표선택 누르시고 EC2 -> 유형은 CPU-utilization 이고 본인 웹서버 ec2로 해서 찾습니다.
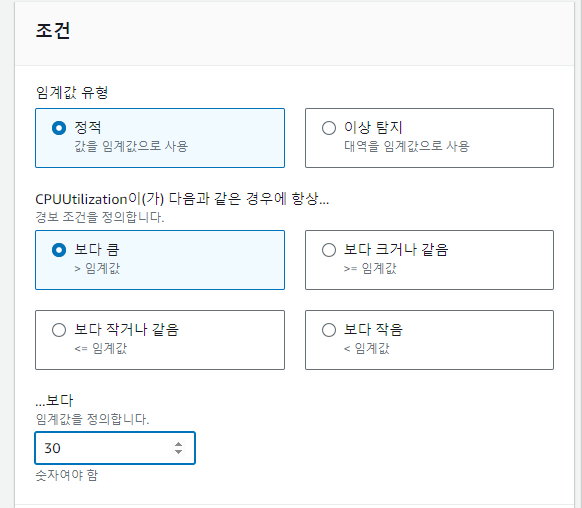
- 그렇게 선택하고 나서, 밑에 임계 값을 원하는 설정으로 정합니다.
- 그리고 나서 아까 만든 SNS 주제와 연결합니다.
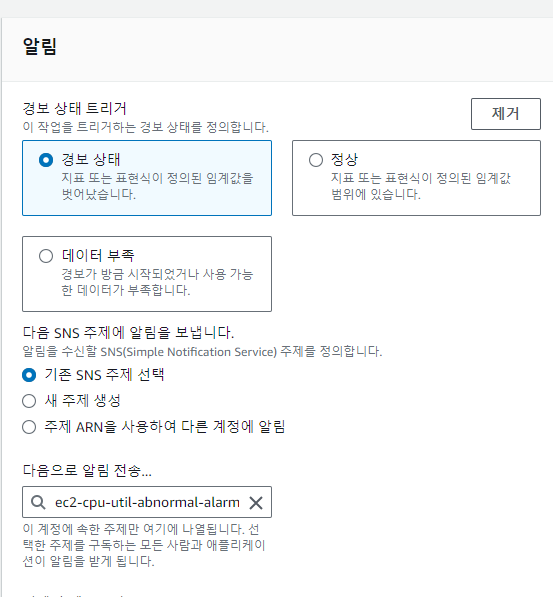
- 그런 다음 그대로 계속 다음 진행해서 생성합니다.
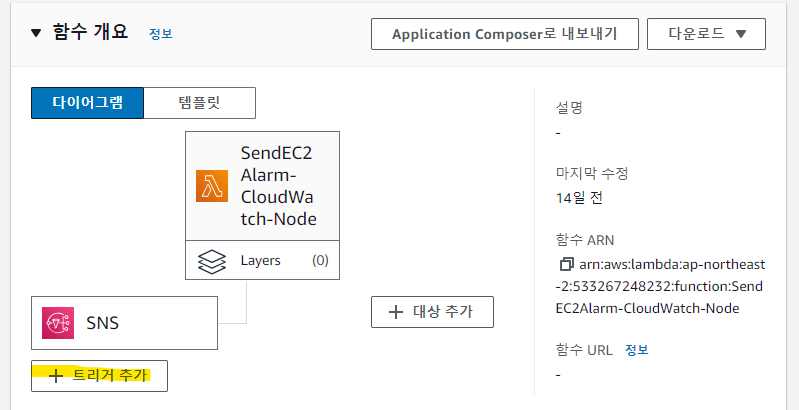
4. Lambda
- Lambda는 서버리스 서비스로, 서버 설치 없이 서비스를 제공할 수 있는 서비스 입니다.
- Lambda -> 함수 생성
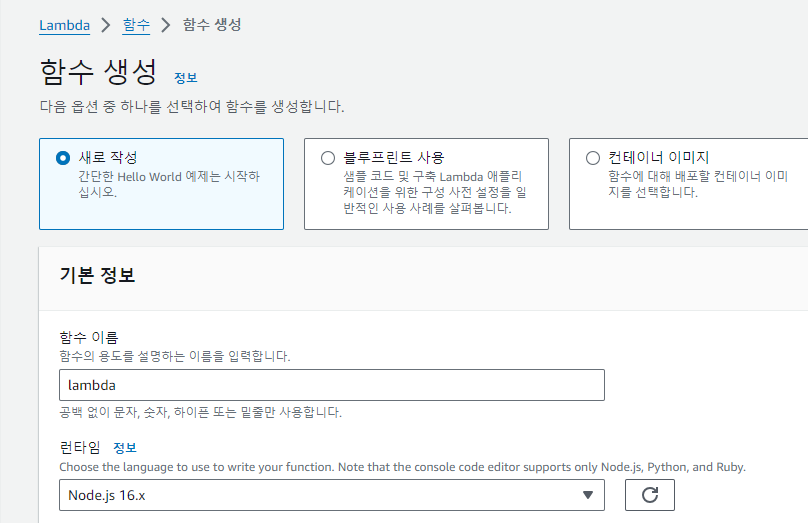
- 이름하고, 런타임 노드 버전만 바꿉니다. (최신 Node.js로 하면 안됩니다.)
자 그럼 밑에 코드가 있는데, 아래 코드를 추가합니다. 기존 꺼 밑에다가 붙여넣습니다.
// 구성 -> 환경변수로 webhook을 받도록 합니다.
const ENV = process.env
if (!ENV.webhook) throw new Error('Missing environment variable: webhook')

const webhook = ENV.webhook;
const https = require('https')

const statusColorsAndMessage = {
    ALARM: {"color": "danger", "message":"위험"},
    INSUFFICIENT_DATA: {"color": "warning", "message":"데이터 부족"},
    OK: {"color": "good", "message":"정상"}
}

const comparisonOperator = {
    "GreaterThanOrEqualToThreshold": ">=",
    "GreaterThanThreshold": ">",
    "LowerThanOrEqualToThreshold": "<=",
    "LessThanThreshold": "<",
}

exports.handler = async (event) => {
    await exports.processEvent(event);
}

exports.processEvent = async (event) => {
    const snsMessage = event.Records[0].Sns.Message;
    const postData = exports.buildSlackMessage(JSON.parse(snsMessage))
    await exports.postSlack(postData, webhook);
}

exports.buildSlackMessage = (data) => {
    const newState = statusColorsAndMessage[data.NewStateValue];
    const oldState = statusColorsAndMessage[data.OldStateValue];
    const executeTime = exports.toYyyymmddhhmmss(data.StateChangeTime);
    const description = data.AlarmDescription;
    const cause = exports.getCause(data);

    return {
        attachments: [
            {
                title: `[${data.AlarmName}]`,
                color: newState.color,
                fields: [
                    {
                        title: '언제',
                        value: executeTime
                    },
                    {
                        title: '설명',
                        value: description
                    },
                    {
                        title: '원인',
                        value: cause
                    },
                    {
                        title: '이전 상태',
                        value: oldState.message,
                        short: true
                    },
                    {
                        title: '현재 상태',
                        value: `*${newState.message}*`,
                        short: true
                    },
                    {
                        title: '바로가기',
                        value: exports.createLink(data)
                    }
                ]
            }
        ]
    }
}

// CloudWatch 알람 바로 가기 링크
exports.createLink = (data) => {
    return `https://console.aws.amazon.com/cloudwatch/home?region=${exports.exportRegionCode(data.AlarmArn)}#alarm:alarmFilter=ANY;name=${encodeURIComponent(data.AlarmName)}`;
}

exports.exportRegionCode = (arn) => {
    return  arn.replace("arn:aws:cloudwatch:", "").split(":")[0];
}

exports.getCause = (data) => {
    const trigger = data.Trigger;
    const evaluationPeriods = trigger.EvaluationPeriods;
    const minutes = Math.floor(trigger.Period / 60);

    if(data.Trigger.Metrics) {
        return exports.buildAnomalyDetectionBand(data, evaluationPeriods, minutes);
    }

    return exports.buildThresholdMessage(data, evaluationPeriods, minutes);
}

// 이상 지표 중 Band를 벗어나는 경우
exports.buildAnomalyDetectionBand = (data, evaluationPeriods, minutes) => {
    const metrics = data.Trigger.Metrics;
    const metric = metrics.find(metric => metric.Id === 'm1').MetricStat.Metric.MetricName;
    const expression = metrics.find(metric => metric.Id === 'ad1').Expression;
    const width = expression.split(',')[1].replace(')', '').trim();

    return `${evaluationPeriods * minutes} 분 동안 ${evaluationPeriods} 회 ${metric} 지표가 범위(약 ${width}배)를 벗어났습니다.`;
}

// 이상 지표 중 Threshold 벗어나는 경우
exports.buildThresholdMessage = (data, evaluationPeriods, minutes) => {
    const trigger = data.Trigger;
    const threshold = trigger.Threshold;
    const metric = trigger.MetricName;
    const operator = comparisonOperator[trigger.ComparisonOperator];

    return `${evaluationPeriods * minutes} 분 동안 ${evaluationPeriods} 회 ${metric} ${operator} ${threshold}`;
}

// 타임존 UTC -> KST
exports.toYyyymmddhhmmss = (timeString) => {

    if(!timeString){
        return '';
    }

    const kstDate = new Date(new Date(timeString).getTime() + 32400000);

    function pad2(n) { return n < 10 ? '0' + n : n }

    return kstDate.getFullYear().toString()
        + '-'+ pad2(kstDate.getMonth() + 1)
        + '-'+ pad2(kstDate.getDate())
        + ' '+ pad2(kstDate.getHours())
        + ':'+ pad2(kstDate.getMinutes())
        + ':'+ pad2(kstDate.getSeconds());
}

exports.postSlack = async (message, slackUrl) => {
    return await request(exports.options(slackUrl), message);
}

exports.options = (slackUrl) => {
    const {host, pathname} = new URL(slackUrl);
    return {
        hostname: host,
        path: pathname,
        method: 'POST',
        headers: {
            'Content-Type': 'application/json'
        },
    };
}

function request(options, data) {
    return new Promise((resolve, reject) => {
        const req = https.request(options, (res) => {
            res.setEncoding('utf8');
            let responseBody = '';

            res.on('data', (chunk) => {
                responseBody += chunk;
            });

            res.on('end', () => {
                resolve(responseBody);
            });
        });

        req.on('error', (err) => {
            reject(err);
        });

        req.write(JSON.stringify(data));
        req.end();
    });
}- 이후에 Deploy를 눌러 배포합니다.
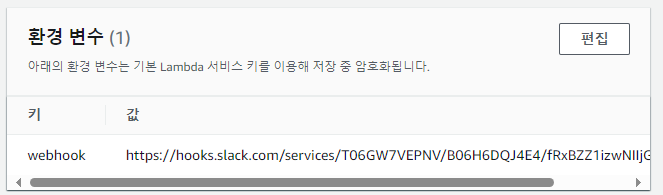
- 그리고 구성으로 들어가서 환경변수 탭에 들어가고, 아래와 같이 환경변수를 추가해줍니다.
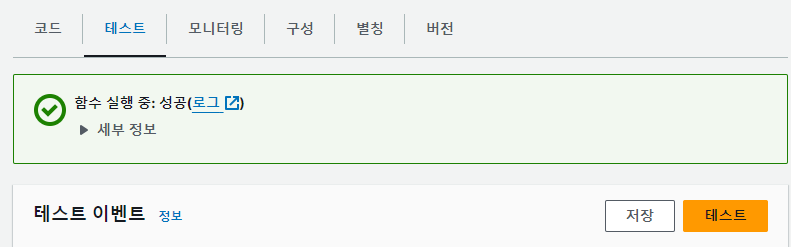
- 그리고 람다가 잘되는지 테스트해봅니다.
- 테스트항목에 들어갑니다. 그리고 테스트 코드 넣는 곳에 해당 코들르 붙여넣습니다.
{
  "Records": [
    {
      "EventSource": "aws:sns",
      "EventVersion": "1.0",
      "EventSubscriptionArn": "arn:aws:sns:ap-northeast-2:981604548033:alarm-topic:test",
      "Sns": {
        "Type": "Notification",
        "MessageId": "test",
        "TopicArn": "arn:aws:sns:ap-northeast-2:123123:test-alarm-topic",
        "Subject": "ALARM: \"RDS-CPUUtilization-high\" in Asia Pacific (Seoul)",
        "Message": "{\"AlarmName\":\"TEST!!!\",\"AlarmDescription\":\"EC2 CPU 알람 (10% 이상 시)\",\"AlarmArn\":\"arn:aws:cloudwatch:ap-northeast-2:123123:alarm:ant-man-live-ALB-RequestCount-high\",\"AWSAccountId\":\"683308520328\",\"NewStateValue\":\"ALARM\",\"NewStateReason\":\"Threshold Crossed: 1 datapoint (10.0) was greater than or equal to the threshold (1.0).\",\"StateChangeTime\":\"2021-07-14T23:20:50.708+0000\",\"Region\":\"Asia Pacific (Seoul)\",\"OldStateValue\":\"OK\",\"Trigger\":{\"MetricName\":\"CPUUtilization\",\"Namespace\":\"AWS/EC2\",\"StatisticType\":\"Statistic\",\"Statistic\":\"MAXIMUM\",\"Unit\":null,\"Dimensions\":[{\"value\":\"i-0e3e982bf1c7f0910\",\"name\":\"EngineName\"}],\"Period\":300,\"EvaluationPeriods\":1,\"ComparisonOperator\":\"GreaterThanOrEqualToThreshold\",\"Threshold\":1.0}}",
        "Timestamp": "2021-06-07T10:51:39.536Z",
        "SignatureVersion": "1",
        "MessageAttributes": {}
      }
    }
  ]
}
- 그리고 테스트버튼을 누르고 함수실행 결과가 성공인지 확인합니다.
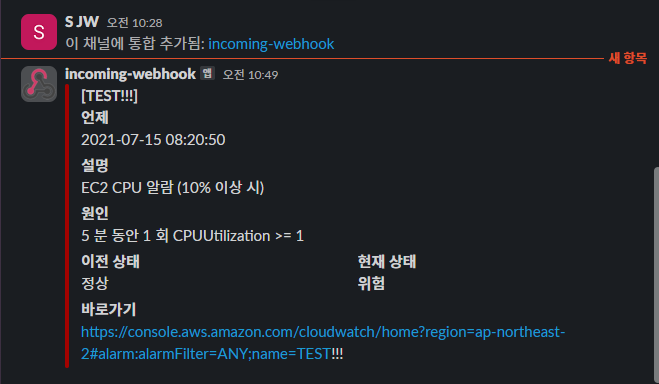
- 그리고 슬랙에 들어가서 자신의 채널에 위와같은 메시지가 오면 성공입니다.
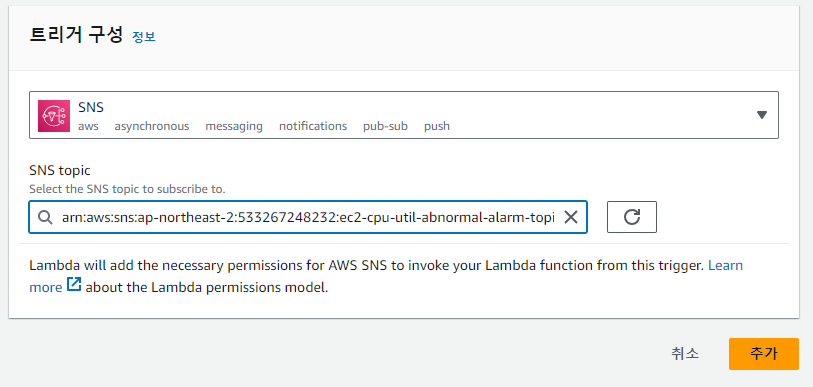
- 그리고 아래와 같은 메시지를 보내게 하게끔 설정인 트리거를 설정합니다.
- 해당 트리거 구성은 SNS 그리고 주제는 본인이 만든 SNS 주제로 설정합니다.
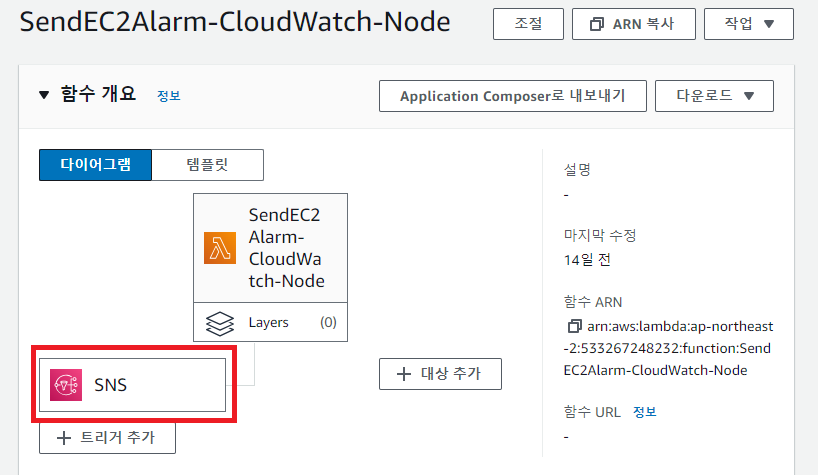
- 이렇게 설정되면 완성입니다!
위와 같이 설정이 완료되었고, 앞으로 이상 발생시, Slack으로 바로 알람이 갈겁니다.
5. 부하테스트
- putty로 웹서버에 접속합니다.
- 해당 명령어를 입력합니다.
sudo -i
amazon-linux-extras install epel -y
yum install stress -y
//설치 완료 후
stress -c 4 (프로세스 4개를 띄워서 서버 cpu 99% 찍는겁니다.
- Slack에 가서 확인하시면
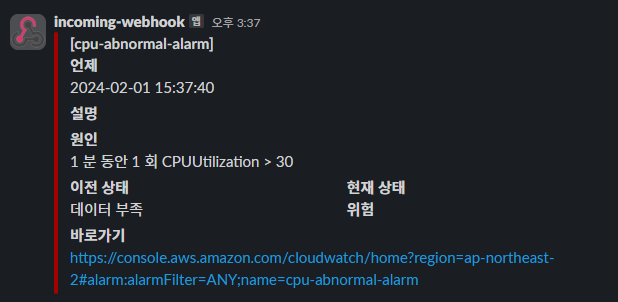
- 이렇게 경보가 옵니다!

답글 남기기